- Internet
- 31.10.2018
- EN
oshyn: OpenText™ Management Server 10: Navigation Manager Design
by: oshyn Team
The implementation of the Navigation in sites sometimes becomes a challenging task with a large quantity of pages. OpenText Management Server offers capabilities to easily accomplish this using the Navigation Manager tool. I developed a design that can be used to create navigations as well as links to pages that are connected to different section in the project.
The Navigation Manager is a tool that can be used to build navigations in the Management Server. This tool uses the navigation structure and templates for the rendering. The navigation structure is the set of pages that may be considered for the navigation. You can check those pages in SmartEdit -> Start -> Browse Navigation -> Project -> Navigation Structure.
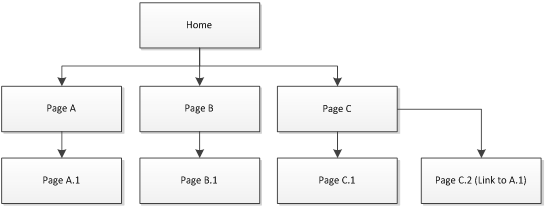
Suppose that we have a site with the following structure:

Note that the above diagram shows a simple site that we will use as our example for implementing Top Navigation. To accomplish this, these steps need to be followed.
1. Create the templates for the Navigation
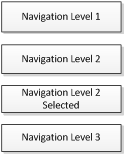
You need to create the templates for each level of the navigation. The following templates can be used:

Navigation Level 1
This template represents the first level of the navigation. It can contain only the <ul></ul> tags enclosing the render tag
<navigation:nextlevel>
to print the next level of the navigation.
(Note that I am using ul tags in order to easily use CSS for the navigation look and feel.)
Navigation Level 2 and Selected
This template represents the second level of the navigation and it should render the pages under Home in the navigation. The template should look like:
<li><a href="<%!! Context:CurrentIndex.GetUrl() !!%>">
  <%!! Context:CurrentIndex.Headline !!%>
  <ul>
    <navigation:nextlevel>
  </ul>
</li>
Note that I am using two additional RenderTags here, one to get the URL of the page and another to print the headline.
The navigation Level 2 Selected should look very similar to the above one, but it may contain different html and styles. The idea to have a selected template is for when the user is in the A or A1 page, it shows the Top Navigation A as highlighted.
Navigation Level 3
This navigation level just needs to print the links that represents the pages in the third level. The template should look like this:
<li><a href="<%!! Context:CurrentIndex.GetUrl() !!%>"><%!! Context:CurrentIndex.Headline !!%></a></li>
2. Create Navigation Areas
For this step, you need to go to SmartEdit -> Start -> Browse Navigation -> Project -> Navigation Areas. I Here, you need to define the name of your navigation, the templates that are going to be used for each level, and define selected/not selected for each template.
3. Include the Navigation
The next step is to include the navigation into the templates. In order to do this, the template that represents the header of your site needs to include the following code:
<%!! Navigation:OutputArea(TopNavigation) !!%>
Now the navigation is ready for your site, but it is pending on the implementation for the case of the page C.2. For this, we need do the following:
- Add an additional anchor field anc_link to your page template.
- Add logic to the Navigation Level 3 template that detects that if that link is not empty; print that field instead of the URL of the page.
The style sheets are going to be in charge of the look and feel of the navigation and that is up to you to implement a visual design according your needs.
OpenText Management Server is a good solution for implementing navigations in a site in a quick way. However, it is necessary to use the Navigation Manager Tool and create some templates for the rendering. The big advantage of the Navigation Manager is that the navigation functionality is already implemented and you just need to design how many levels you want to show, the design, and add any additional logic to implement custom cases like the one that I showed here.
Source: OpenText Management Server 10: Navigation Manager Design
© copyright 2012 by oshyn