
- RedDot CMS Blog
- 06.02.2017
- EN
rdb: Digging deeper with Navigation Manager RenderTags – A Beginner’s Guide
This whitepaper has been submitted by Phil McKenzie, a RedDot freelancer who encountered a very common but not so easy to solve problem – building microsites within only one RedDot project but keeping the layout and additional functions flexible. He gave me this document with a nice solution on how to handle several Microsites based on only ONE base page content class, though still with the possibility to be more modular and flexible within layout and appearance.
I’ve slightly adapted/changed some parts (mostly images) of the document to fit in here but if you’d like to, you can also download the original draft by clicking the link below.
Phil McKenzie “Digging deeper with Navigation Manager RenderTags – A Beginner’s Guide”
I’ve recently been working on a client project that has taken an interesting approach to how pages are constructed in the CMS. As a lowly RedDot Journeyman, this required me to delve into the murky world of Navigation Manager RenderTags and I thought I should share some of the triumphs and tragedies I have encountered along the way.
Scenario
The client wanted to create a series of “Microsites”; small sites which are all run as sub-domains of their main corporate website. All Microsites would use the same branding as the parent website and for all intents and purposes would appear to be sub-sections of the main corporate website when published, but would be handled in distinctly separate CMS projects.
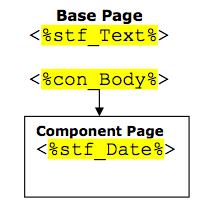
Additionally, the spec included an intriguing requirement; only one base page content class / template was to be created. Any content that required special elements (i.e. elements not included in the base page) was to be added as a “component” page, to a non-targeted container element, within the Base page instance in question. This would allow the client to build pages in a more modular way, rather like the “IKEA” approach.
The basic page hierarchy was to look like this
 This seemed simple enough, but almost immediately it raised a few questions; one of which is: how exactly can you pull component page information into lists? If you have a list containing a series of base pages, (each of which contains a component page in a container), how do you use the standard “list element and block marks” method:
<!IoRangeList><%lst_MyPageList%><!/IoRangeList>
…to return information about the <%stf_Date%> element within the component page for example? If there is an easy way to do this, I couldn’t find it…
My next thought was: Oh well, I can probably do this with RQL. But then the client dropped a clanger: the solution had to be entirely free of RQL. Their current projects make heavy use of RQL to render navigation and this has caused them some issues in the past. In-house RQL skills were a bit limited and RQL adds an extra level of complexity which they were keen to avoid if possible in the construction of their new Microsites.
With RQL effectively ruled out as a possibility, I was left with only one possibility;
the use of the newly available Navigation Manager RenderTags.
RenderTags?
I’d never used Navigation Manager RenderTags before and although I was aware of their existence, I had no idea of what they were capable of doing.
Additionally, the amount of reference material available was limited to a Navigation Manager Course manual (a good starting point, but it quickly became more useful as a coffee mat) and a copy of the Navigation Manager “Cheat Sheet” supplied by RedDot at their Last Community Day in 2008. The cheat sheet is a useful reference, but of course it contains only simple examples.
So I was forced back into the old coding standby: just muck about with it until you get something to work!
Cheat sheet available from RedDot support upon request and on the Community website.
First Steps (building a simple project framework)
Of course, in order to develop a render tag solution, I had to set-up a simple page structure which would emulate the eventual structure I wanted. Initially, I created a new CMS project and enabled Navigation Manager within the project (rdb: This is still required to enable the usage of RenderTags inside your project.).
Once the project was created, I imported a base page class from the main corporate website, trimmed out all spurious and redundant elements and gave the template a good going over to cleanup and simplify the code as much as possible. The base page template I used already had a non-targeted container element called: con_Body which suited my purpose. The template also contained a simple standard field element called: stf_Text which had no special attributes, other than a maximum length of 100 characters.
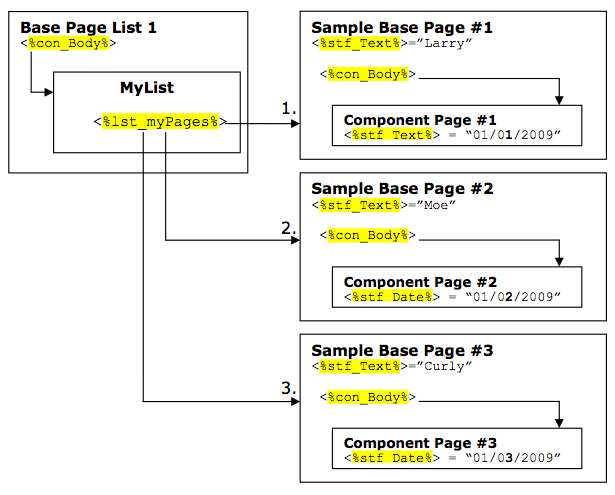
Once this simple base page template was complete, I used it to create three unconnected sample base pages. Each sample base page then had its: stf_Text field set to a unique value (“Larry”, “Moe” and “Curly” respectively).
Once the sample base pages were created, I then created a simple component content class called: “MyComponent”. This content class contained a single element: a standard text field called: stf_Date. The field attributes were then amended to format the field as a user-defined dd/MM/yyyy field value.
Next, a single component page instance of the MyComponent content class was created and connected into the: con_Body container element of each of my three sample base pages. Each MyComponent page instance had it’s: stf_Date field set to a different (legitimate) date.
Lastly, a simple list content class called: “MyList” was created. This content class contained a single list element called: lst_myPages. The list had no special attribute settings. A page instance of MyList was then created and connected to one last base page in the project. Then the three sample base pages I created earlier were then connected to this list.
Being the bitter cynic that I am, I then submitted / release all pages from the default project workflow, in order to avoid any linking / rendering issues.
So – my page structure now looked like this:
My First Render Tag
With the basic page framework built I edited the: MyList template and started by trying to return the: stf_Text value in each of my sample Base pages. I knew I would need to look at some kind of loop and a quick look at the cheat sheet gave me an example which I modified to work with my setup. After a little fiddling, I came up with this, which seemed to work.
 RenderTags & PreExecute
<!IoRangePreExecute>

<reddot:cms>
	<foreach itemname="testList" object="Context:CurrentPage.Elements.GetElement(lst_myPages).Value" countername="listCounter">
		<htmltext>
			<%
				MyElemText = "<%!! Escape:HtmlDecode(Store:testList[Int32:listCounter].Elements.GetElement(stf_Text).Value) !!%>"
				response.write MyElemText
			%>
		</htmltext>
	</foreach>
</reddot:cms>

<!/IoRangePreExecute>
Breaking it down…
So what exactly have we done here? For those of us who are inexperienced with this type of XML-driven construct, let’s take a closer look at the bits I have coloured up in this example in a little more detail.
Between the: <reddot:cms> and: </reddot:cms> tag pair (which are kind of like blockmarks for RenderTags), we have created a <foreach> construct, which is the XML version of a for/next or do/while loop, more commonly used in languages like ASP.
Inside the <foreach> loop, we add an <htmltext> </htmltext> tag pair. This tells RedDot that the code between the <htmltext> tags should be rendered as HTML (this includes running pre-executed ASP). In this instance, because we are using a little bit of Vbscript the whole code snippet has been wrapped in a pair of standard CMS pre-executing blockmarks (<!IoRangePreExecute> <!/IoRangePreExecute>).
In my example above, the <foreach> construct has been given a reference name (testList) and we have told RedDot that what we want to interrogate is an element on the (CurrentPage.Elements.GetElement). We have also told RedDot that the name of the element we want to check is called: lst_myPages and that the information we want to obtain, is the Value of the field in question.
In this particular example, because the element we are interrogating (lst_myPages) happens to be a list element, RedDot will automatically create the testList object as a collection of pages. This is very handy for reasons that will become apparent shortly.
Lastly, we have also told RedDot that we want a counter called: listCounter. This counter will be automatically incremented by: 1 every time the <foreach> loop is run through. As our test page setup has three sample base pages connected to the list in question, the counter therefore will be incremented 3 times. The counter starts at a value of: 0 and so its final value after being incremented 3 times will be: 2.
With this basic construct, we now have the ability to examine each page in the testList page collection we
have created in the <foreach> loop.
Getting the field value into a Vbscript variable
Next, within a pair of <% Vbscript tags %> we reference the page instance of the: testList page collection
and the counter value: listCounter in much the same way as we might reference an array instance in Vbscript or ASP.
 RenderTags & VBScript
<%
	MyElemText = "<%!! Store:testList[Int32:listCounter] !!%>"
%>
…and then we use this to obtain the Value of the: stf_Text element on that particular page:-
 RenderTags & VBScript
<%
	MyElemText = "<%!! Store:testList[Int32:listCounter].Elements.GetElement(stf_Text).Value !!%>"
%>
The Next Steps
So far so good; we can now return a field from each base page in our list. Now we need to get the render tag, to dig one level deeper and to look at the component page instance within each base page and in this example, return the value of: stf_Date from each component page instance.
We know that the component page is connected to a container which always has the element name: con_Body. So we can change our render tag from this:-
 RenderTags & VBScript
<%
	MyElemText = "<%!! Store:testList[Int32:listCounter].Elements.GetElement(stf_Text).Value !!%>"
%>
…to this:-
 RenderTags & VBScript
<%
	MyElemText = "<%!! Store:testList[Int32:listCounter].Elements.GetElement(con_Body).Value[Int32:0].Elements.GetElement(stf_Date).Value !!%>"
%>
This tells RedDot; find the first component page in the: con_Body container of the parent page ([Int32:0]) and then get the Value of the element: stf_Date.
Another Page Source?
In the previous example, we have interrogated a list element on the current page. But RenderTags can just as easily be used to interrogate another page in the CMS. All we need is the GUID of the page we want to use. This is particularly useful and a situation where – if you’ll pardon the pun – RenderTags come into their element.
Let’s imagine a simple example; suppose that our component page was set-up to hold the details of an event. Each event would have a “from date” and a “to date” text element. We want to separate events that are past from events that are either current or will be held in the future and display both lists on different pages. If we create two separate lists using our original example above, we have a big manual overhead because as events pass, we have to manually transfer them from one list to another and republish.
A better way would be to have one list of events that we can point two different MyList pages at and using a combination of RenderTags (and a little Vbscript to filter the results), we could produce one list of past events and one list of present/future events. This approach would mean that the lists would be updated automatically.
The first thing to do is provide the list template with the ability to use another page source. The: MyList content class / template is edited and a new standard text field called: stf_PageGUID is created. The element has no default value and has no other attribute changes defined.
The MyList template is then amended as shown:-
 RenderTags & PreExecute
<!IoRangePreExecute>
<% if trim("<%stf_PageGUID%>" <> "" then %>

	<reddot:cms>
		<foreach itemname="testList" object="Context:Pages.GetPage(Guid:<%stf_PageGUID%>).Elements.GetElement(lst_myPages).Value" countername="listCounter">
			<htmltext>
				<%
					MyElemText = "<%!! Escape:HtmlDecode(Store:testList[Int32:listCounter].Elements.GetElement(stf_Text).Value) !!%>"
					response.write MyElemText
				%>
			</htmltext>
		</foreach>
	</reddot:cms>

<% else %>

	<reddot:cms>
		<foreach itemname="testList" object="Context:CurrentPage.Elements.GetElement(lst_myPages).Value" countername="listCounter">
			<htmltext>
				<%
					MyElemText = "<%!! Escape:HtmlDecode(Store:testList[Int32:listCounter].Elements.GetElement(stf_Text).Value) !!%>"
					response.write MyElemText
				%>
			</htmltext>
		</foreach>
	</reddot:cms>

<% end if %>
<!/IoRangePreExecute>
Note: The rather untidy if/then/else arrangement shown above appears to be necessary, due to the fact that RedDot does not render Vbscript until after the RenderTags are processed. This means that you cannot embed Vbscript variables in RenderTags. See the “Limitations of RenderTags” section that follows. For the sake of simplicity, subsequent code snippets do NOT include this option.
The Page GUID of the base page containing the original: MyList component page element of the MyList page is then obtained, by selecting the base page in SmartTree and then clicking the “Show Element Information” icon in the SmartTree Action Menu.
Next, A new base page is created and connected to the TOC / Admin page of the project and a new instance of the MyList component page (called: MyList2) is created and connected to its con_Body container.
The last step is to edit the: <%stf_PageGUID%> element instance on the newly created MyList2 component page and set it to be the GUID of the Base Page which contains the original MyList component page instance.
The project structure now looks like this:
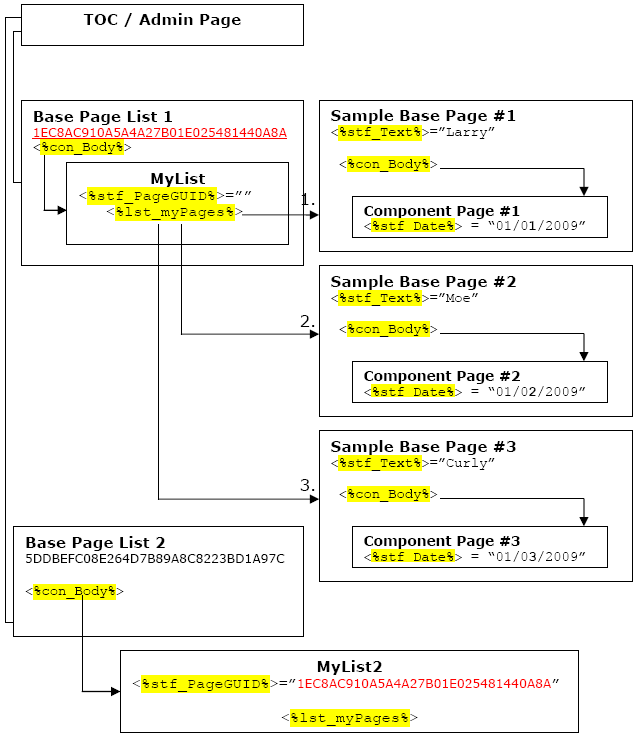
Project structure after adding another page source
Now, the MyList2 Component page can read the: MyList component page list on Base Page List 1, by referencing the Page GUID of Base Page 1, as it’s link.
We can now expand out the MyList content class to sort its list entries accordingly and separate past from present/future events. Then, with the addition of a simple option list element, we can use the same content class to display the two different event lists, from two different component page instances in two base pages.
Before we do that however, we first need to return the render tag results into a Vbscript array.
Returning Render Tag Results into Vbscript arrays
So far, our setup has returned the value of each component page into a Vbscript variable called: MyElemText. Of course, each time we loop through the <foreach> construct, the value of MyElemText gets over-written.
But what if want to write the results into an array? In Vbscript arrays are defined as follows:-
 VBScript
	Dim MyArray(10)
…this presents us with a couple of issues; first, we need to know how many pages will be returned in the <foreach> loop so we can define the number of elements in our array. Secondly, we have to define the array before the <foreach> loop is run, as a dim statement can only be defined once in a page.
The solution to these problems is to create a <foreach> loop that is run before our current loop. All it does is count up the number of pages connected to the: lst_myPages list element. Then all we have to do is insert the: listCounter value into the: Dim statement as shown.
 RenderTags & VBScript
<reddot:cms>
	<foreach itemname="testList" object="Context:CurrentPage.Elements.GetElement(lst_myPages).Value" countername="listCounter">
	</foreach>
</reddot:cms>

<%
	Dim MyArray(<%!! Store:listCounter !!%>)
	MyCounter = 0
%>
So now we can load the element results into an array! In preparation for this, we have also added a new: MyCounter integer variable and set it to: 0.
The template now looks like this:-
 RenderTags & PreExecute
<!IoRangePreExecute>

	<reddot:cms>
		<foreach itemname="testList" object="Context:CurrentPage.Elements.GetElement(lst_myPages).Value" countername="listCounter">
		</foreach>
	</reddot:cms>

	<%
		Dim MyArray(<%!! Store:listCounter !!%>)
		MyCounter = 0
	%>

	<reddot:cms>
		<foreach itemname="testList" object="Context:CurrentPage.Elements.GetElement(lst_myPages).Value" countername="listCounter">
			<htmltext>
				<%
					MyElemText = "<%!! Escape:HtmlDecode(Store:testList[Int32:listCounter].Elements.GetElement(stf_Text).Value) !!%>"
					response.write MyElemText
				%>
			</htmltext>
		</foreach>
	</reddot:cms>

<!/IoRangePreExecute>
So all we need to do, is replace the MyElemText variable reference:
 RenderTags & VBScript
<%
	MyElemText = "<%!! Escape:HtmlDecode(Store:testList[Int32:listCounter].Elements.GetElement(stf_Text).Value) !!%>"
	response.write MyElemText
%>
…with the new array value:-
 RenderTags & VBScript
<%
	MyArray(MyCounter) = "<%!! Escape:HtmlDecode(Store:testList[Int32:listCounter].Elements.GetElement(stf_Text).Value) !!%>"
	response.write MyArray(MyCounter)
	MyCounter = MyCounter + 1
%>
…and now we have the field results in an array, which we can then manipulate using Vbscript as required.
Limitations of RenderTags
In my work to date, I have hit a few issues, which as yet I haven’t solved and for which RedDot Support has not given any definitive response to. If anyone else has solutions or workarounds to any of the following, I would certainly be interested to know more…
It’s a SENSITIVE structure
In order to get to this point, I tripped myself up several times with my all-thumbs typing style. RenderTags are case sensitive and have to be entered exactly as shown. Furthermore, the elements being referenced must also be named exactly the same in both the content class and the render tag within your template. Any variation between the two and your render tagging simply won’t work.
It’s therefore pretty important to agree a clear naming convention right from the outset and ensure that the naming convention is enforced in all stages of your project development. If you wait until the end of the project to cleanup and rename elements in a consistent manner, you may very well find that many of your templates no longer work, as the RenderTags are now looking for elements which – technically – don’t exist in your templates any more. You have been warned!
RenderTags can’t return info element values
Rather annoying this. RenderTags appear to work on most of the more common elements (to date I have tested them on anchor tags, containers, lists, media elements, standard text and text elements, option lists, transfer elements), but for some reason, they don’t work with info elements. A RedDot consultant who visited us recently stated that this was due to the way info elements were stored in the database.
However, you can still use RenderTags to obtain a little bit of information from a page, which would typically be included in an info element. The best example of this is of course the GUID of the sample base page, which could be obtained using the following render tag:
 RenderTags & VBScript
	PageID = "<%!! Store:testList[Int32:listCounter].Elements.GetElement(con_Body).Value[Int32:0].Id!!%>"
It’s not much, but it helps…
Text elements containing carriage returns and / or line breaks can cause problems
This is not really a render tag issue, but rather a Vbscript limitation. But it’s something that tends to really manifest itself when RenderTags are used. A solution using Jscript has been developed by Adrian Mateljan and is available at: rdb: Escaping RedDot
RQL and RenderTags?
My handful of attempts to create a template which both created a render tag and ran a bit of RQL ended with abject failure and RedDot support advised me that the two should never be used together or as the support person told me: “unexpected results may occur”.
Vbscript variables in RenderTags
Disappointingly, you can’t use Vbscript variables inside your render tag constructions. For example, you can’t do the following:-
 RenderTags & VBScript
<%
	MyElement = "<%stf_myElemName%>"
	MyArray(MyCounter) = "<%!! Escape:HtmlDecode(Store:testList[Int32:listCounter].Elements.GetElement(” & MyElement & “).Value) !!%>"
%>
…this is because RenderTags are processed before Vbscript by the RedDot rendering engine, which of course means that Vbscript variables will all return a null value. This can in turn cause templates to be drastically inflated in size. An example of this is the previous template example on page #5, where we introduce the option of using a page GUID other than the current page. Because we can’t embed Vbscript variables into or RenderTags, we are forced to create an if/then/else arrangement for the variations within the <foreach> loop. Argh!!
Summary
My first foray into using RenderTags has shown that they are surprisingly powerful and capable of doing some pretty useful stuff in a more straightforward way than RQL in some instances. That said, it’s important to be aware of some of the more annoying limitations, before embarking too far down the render tag road. Otherwise you may live to regret yet another aspect of RedDot.